× Search

How to... approve/reject pending users

This page shows how Owners and Admins can approve or reject new users

Please read on if you received an email like this and have a few questions.

SUBJECT: School admin – You have a new user awaiting approval

BODY:

Hello {Your Name},

{Colleague’s Name} wants to be added to {Your Company}’s Supply Chain Sustainability School account. Please Login here to view their details, and accept or reject their application.

    • Their details will appear in the “Pending” section of the “View all colleagues” on your dashboard.
    • This user cannot access your organisation’s account until they have been accepted by an Administrator.
    • If you rejected this user by accident, don’t worry – simply send them an invite from your dashboard.

You are receiving this email because you have been named as an Administrator of this company’s account – please disregard if you have received this message in error.

Many thanks, the Supply Chain Sustainability School team [email protected]

How to find the “Pending” section of “View all colleagues” on your dashboard

Step 1: Log in
Click on the 'LOG IN' icon in the top right of your screen.
Log in here
Step 2: Go to your Company Dashboard
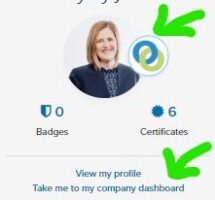
The top right of your screen will now say 'Welcome, {Name}' 'DASHBOARD' 'LOG OUT'. Click on 'DASHBOARD'. Your default dashboard is your personal dashboard. In the top left of your personal dashboard, click on your company's icon or the link 'Take me to my company dashboard'.
Step 3: Find your colleagues
In the first column of tiles find the 'Our people' section. Under your Account Owner's details, click on the link 'View all colleagues'
Step 4: Manage user requests
Click on the 'Pending' tab and use the icons in the Manage column to accept or reject each user request.
Step 5: Assign roles
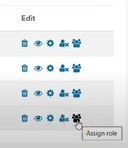
All new users will default to 'Member' roles. If you want the new user to complete company assessments, view company action plans or invite, approve or reject new users, then you need to assign them the role of 'Admin'. To do this return to the 'Colleagues' tab, look on the right for the 'Edit' column and use the 'Assign role' icon.